UNITED STATES – WYOMING
Wind River Range Backpacking

20 August 2019
The Wind River Range is a relatively unknown mountain range stretching from Central Wyoming towards the Northwest corner of the state. The fact that such a beautiful range is unknown, to me, is a statement to just how incredible the landscapes are in this country. Don’t discount this region; Much of the reason it’s not well known is due to its inaccessibility not a lack of beauty. Unlike the Tetons nearby, rather than driving up to the views, you’ll have to earn them.
With that said, two friends and I planned an approximately 60 mile, 6 day/5 night backpacking trip around the southern portion of the range. While I can’t take credit for the details of the route, it was designed to show us the majority of the highlights in a single trip. These areas are typically visited separately as the trails don’t all connect, preventing them from being linked. After much research, my friend put together some off-trail sections to bring all the highlights together. This wasn’t a hike with highlights, it was a hike of highlights. While the off-trail sections were relatively easy, there is a need for some basic route-finding skills. Also, be advised that certain parts required extensive rock-hopping, steep downhill sections and some bushwhacking. Our pack weights ranged from 23 to 30 pounds and made it all quite manageable.
Before getting into the day to day specifics, I’ll cover some general information.
- With the route passing multiple water sources each day, keep at least a liter on hand and filter on an as-needed basis. Each night, we set up camp on or very near a lake.
- Mosquitoes can be very heavy during the summer months. They weren’t an issue for us while hiking but were abundant when camping in the evening. Pants paired with a hooded pullover was sufficient for me. However, a Buff or picaridin bug spray would be useful as well.
- This is a high-elevation hike and altitude sickness could be an issue. Elevation along the route ranges from 10,000-12,500 ft.
- Snow can last into late summer. We did the hike in mid-August and encountered some snow on Texas Pass (11,500 ft.)
Day 1
Before I get to the hike, there are some things to be aware of involving driving there. You’ll be making a nearly hour drive down a dirt road that crosses an Indian reservation. The road is in fairly good shape but I’d recommend at least having a full-size car if not an SUV. In order to cross the Indian reservation without risking a costly fine, a fishing permit is required. For the drive in and back out, this will cost $70. No one likes to have to spend extra money but this does have the benefit of keeping this trailhead less visited than others nearby.
The hike begins at Bears Ears trailhead. We opted to camp the night before in the Dickinson Park campground to make for an easier start. Day 1 is difficult with the hike beginning uphill and staying that way for the majority of the day. While there is a lot of elevation gain for the day, the trail uses extensive switchbacks to maintain a tolerable grade. As you near the maximum altitude for the day, you’ll have the option to make your way to the peak of Bears Ears or Mt. Chauvenet. I’d recommend enduring a little more climbing as the views into the Smith Lake Basin are incredible. Shortly after cresting the uphill section, you have a choice on where to sleep for the night. You can either go to Valentine Lake or Dutch Oven Lake. We opted for Dutch Oven Lake as it’s less frequently visited and we’d read some reports of bear activity (take a bear bag) around Valentine Lake. If you do the same, you can shave off a couple of miles and get better views by going off-trail. The route we took followed a mountain stream most of the way down. Towards the bottom, you’ll have to find your way through a forested section down to the lake. We had the lake all to ourselves finding plenty of flat ground for camping along the east side.
Day 2
Your second day will start with an extended downhill drop eventually leading to Gravel Lake. The lake is great for fishing and is a good place to stop for lunch. From there, you’ll begin to ascend well above the banks, following a fun stretch that overlooks the lake. As the lake ends, the trail will soon split. Staying to the right will lead to Mt. Hooker and Baptiste Lake. While this is a one-way trail, this was our favorite campsite and our early arrival offered plenty of time to explore the surrounding area. Make sure to climb up the cliffs to the northwest of Baptiste for the best views of sunset/sunrise.
Day 3
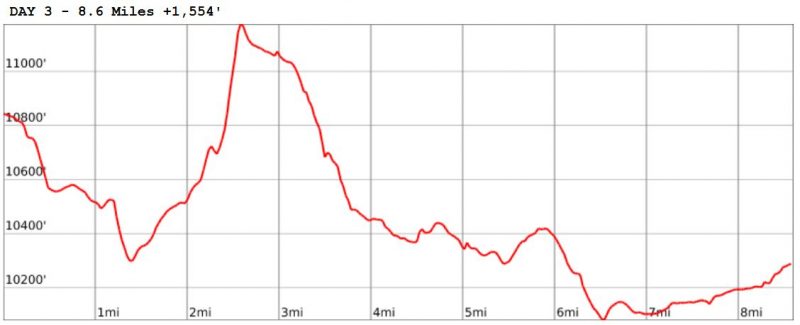
The third day is a mixed bag. Expect to spend most of your time hiking the extremes. Whether it be tough climbs or quick drops, you won’t experience much flat terrain until you near camp. The day begins by retracing the trail back from Baptiste Lake. You’ll have to lose your shoes in the valley to cross Baptiste Creek. After that, prepare for the first proper pass of the hike. Haily Pass is difficult but well-traveled. Luckily, the steepest portion is rather short. At the top, you’ll again have the chance to bag a peak; this time Pyramid Peak. Just a warning, the view of the “peak” from the top of the pass is actually a false peak. The actual peak takes a good bit more effort. While the views from this peak aren’t as good as those on day one, it’s still a nice addition if you’ve got the energy. Regardless of your choice on Pyramid Peak, you’ve completed the toughest part of the day. After the steady downhill to Mays Lake, you’ll eventually cross a meadow towards Shadow Lake with plenty of camping options along the way. We stopped just shy of the lake, finding a picturesque view of the backside of the Cirque.
Day 4
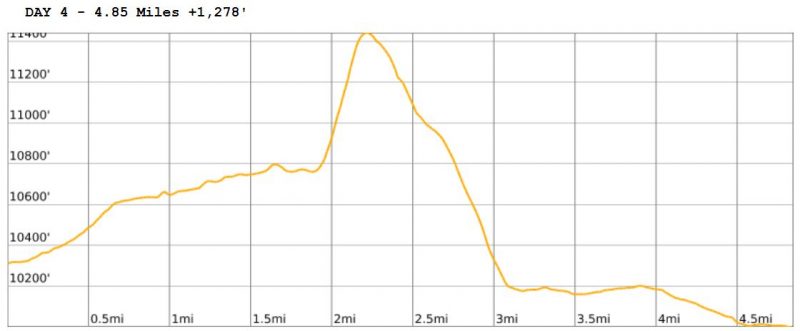
This day starts traveling past several lakes, soon reaching Texas Lake. From here, you’ll see the toughest pass of the trip. Texas Pass is technically a social trail. You’ll find some clear routes to the top but don’t expect any well-designed switchbacks. Crossing over the pass you’re in for a dramatic view of the Cirque of the Towers. It’s difficult to capture such an immense landscape in pictures. Go slow and take it in on your way down to Lonesome Lake. Camping isn’t allowed within a quarter mile of the lake so your best option is to continue on to Lizard Head Meadows. After setting up camp, hiking a bit further to some slow waters of the Popo Agie river just west of Papoose lake is a worthy side trip with a nice view of Dog Tooth Peak.
Day 5
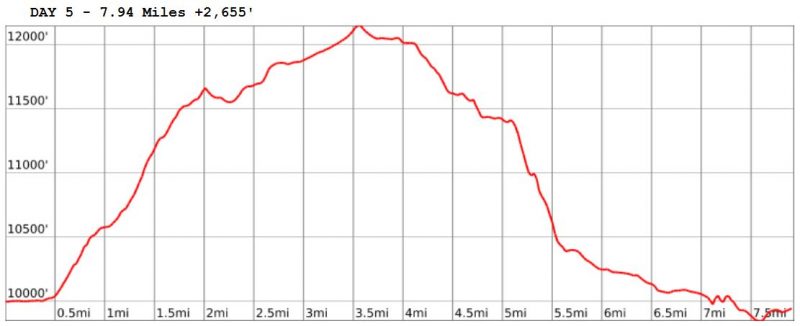
This day is a little different than the others. About half the day will be spent off-trail and map reading will be important. Unlike previous days, water will only be available at the beginning and end of the day. Soon after the hike begins, you’ll turn left onto the Lizard Head Trail. While this isn’t the steepest uphill section, for me, it was the toughest. The trail continues upward sharply for an extended period. At the top of Lizard Head Pass, you’ll veer off the trail to the east. This off-trail hiking will continue for the majority of the day. To start, the alpine meadow is easy to traverse. Eventually, a rock field will emerge and taxing rock hopping will be required for half an hour. Using a topographic map, follow the contours to the drainage leading down to Cook Lake. This section is the most difficult. Do your best to find your way among grassy patches and avoid the loose scree. From Cook Lake, find your way along the river to the east down to Smith Lake. Here, you’ll be able to meet up with the Smith Lake Trail. This official trail will terminate at Middle Lake. For the best experience, continue on following one of the social trails on to Cathedral Lake. This lake sits just beneath Cathedral Peak and you’ll likely have it all to yourself.
Day 6
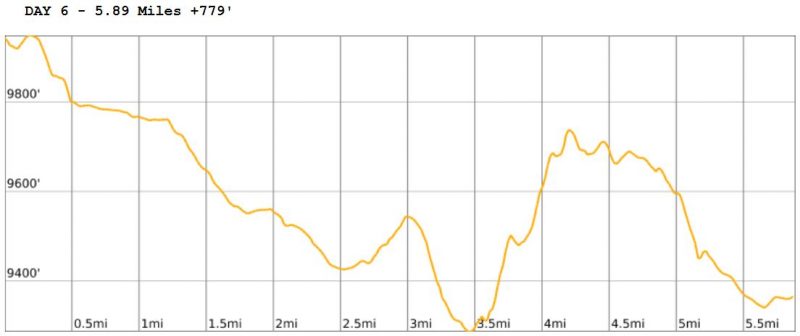
The last day is short on highlights but, alas, you’re just hours away from a hot meal and shower. Whether from Upper Cathedral Lake or Catherdral Lake, follow the Smith Lake Trail back to the Dickerson Park trailhead. You’ll mostly encounter flat terrain until the last couple of miles. There, you’ll have one final uphill portion before a drop into the meadow below. We were able to park our car there and have someone drive us to the Bears Ears trailhead. If you weren’t as fortunate, simply hike a couple of miles along the road back to your starting point.
Subscribe to our Awesome Newsletter.


